Stairwell Wall Construction Plan - Visual Mockup
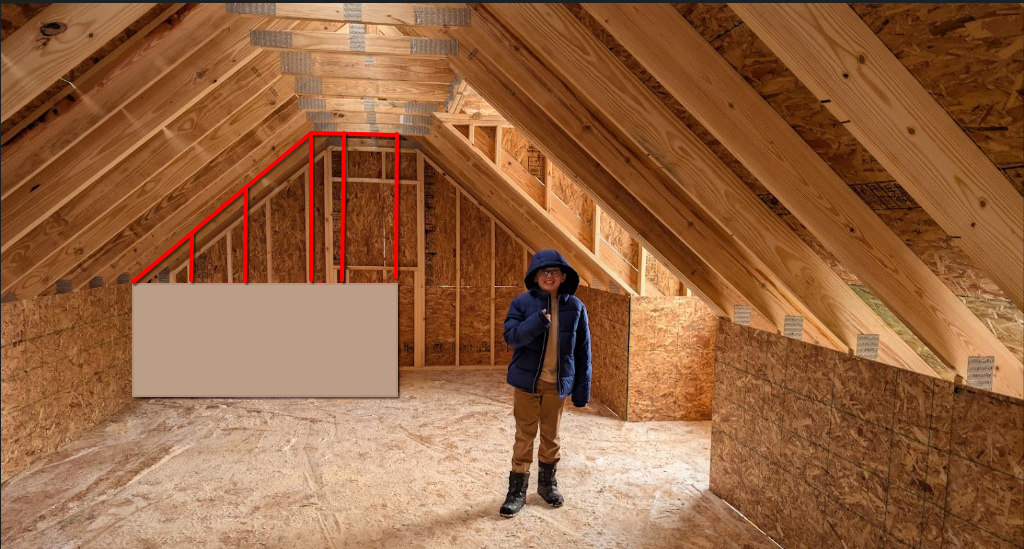
Photo Details
- Date: January 29, 2026
- Type: Planning mockup (MSPaint-style annotation)
- Purpose: Visualize proposed stairwell guardrail/wall construction
- Base Photo: Loft interior from January 27, 2026 inspector visit
Mockup Legend
| Color/Element | Represents |
|---|---|
| White/Gray solid area | Plywood/OSB sheathing (lower ~42” for code-compliant guardrail) |
| Red lines | 2x4 stud framing extending to ceiling joists |
Construction Plan Overview
This mockup illustrates the “full wall now, partial sheathing” approach for the required stairwell guardrail:
Phase 1: Immediate (Guardrail Compliance)
- Frame full-height wall with 2x4 studs 16” on center
- Attach bottom plate to subfloor, double top plate to ceiling joists
- Sheath stairwell side only from floor to 42” with scrap plywood/OSB
- Satisfies building inspector’s guardrail requirement
Phase 2: Future (Bathroom Conversion)
- This wall becomes the separation between stairwell and bathroom
- Add insulation in stud cavities (sound dampening)
- Sheath and drywall the bathroom side
- Extend sheathing/drywall to ceiling on both sides
- Install bathroom fixtures using pre-installed blocking
Why This Approach
- Code compliant now — 42” sheathed guardrail meets fall protection requirements
- Future-proof — Full framing eliminates rework when building bathroom
- Cost effective — Uses scrap materials for temporary sheathing
- Structural — Full-height attachment to ceiling joists provides rigidity
- Practical — Add blocking for bathroom fixtures while wall is open
Why Stairwell Side Sheathing
The plywood goes on the stairwell side (not room side) for practical construction reasons:
| Consideration | Stairwell Side ✓ | Room Side ✗ |
|---|---|---|
| Bathroom construction | Work from spacious loft | Work from stairwell (awkward) |
| Adding insulation | Easy access from room side | Difficult from stairwell |
| Running electrical | Work from open room | Work on ladder in stairwell |
| Finishing sequence | Stairwell finishes last anyway | Room needs clean look sooner |
Key insight: The stairwell will likely be one of the last areas to receive drywall, so temporary plywood there is perfectly acceptable.
Installation note: Attach plywood with screws (not nails) for easy removal when finishing the stairwell with drywall later.
Measurements Note
Mockup Dimensions Are Approximate
All measurements in this visualization are rough estimates for planning purposes only. Actual dimensions will be measured on-site and a proper construction plan created before work begins.