Building Inspector Visit - Stairwell Railing Required
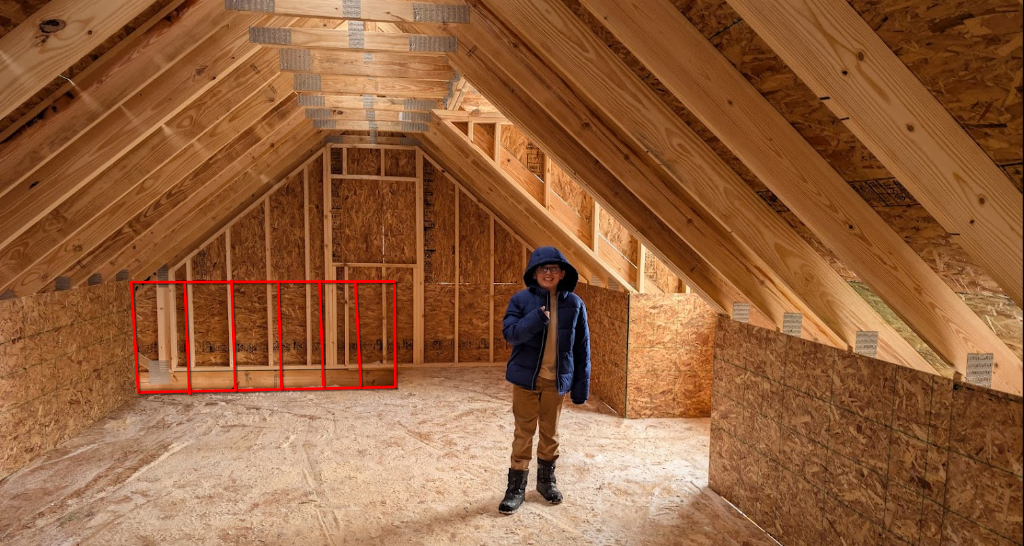
Photo Details
- Date: January 27, 2026
- Time: 5:54 PM EST (from filename)
- Phase: Post-initial build / Interior completion
- Location: Loft level, garage interior
- View: Looking toward dormer window from near stairwell opening
Inspection Summary
Inspector Visit: Tuesday, January 27, 2026
Result: Passed with requirements noted
Requirements
-
Guardrail at stairwell opening (required) — Install a railing/guardrail at the loft stairwell opening. The red lines in this annotated photo indicate the required railing location along the open edge to prevent falls.
-
Handrails on stairway (can wait) — Handrails required on stairway, but inspector noted these can wait until after interior finishing (insulation/drywall) is complete. No sense installing them only to remove for finishing work.
Inspector Recommendations
- Second breaker box for upstairs — If planning to convert loft to apartment in the future, recommended installing a separate subpanel upstairs so a tenant could reset their own breakers. Inspector confirmed:
- Homeowner can self-install if space is used as general purpose first, then converted to apartment later
- If building as apartment immediately, would require licensed electrician due to certain codes
- This approach allows cost savings on electrical work
Electrical Planning Decision
Based on inspector guidance, the plan is:
- Main floor: Outlets and lighting wired to main 200A panel
- Second floor: Install 100A subpanel with all loft circuits (outlets, lights, future HVAC) routed to this panel
- This future-proofs for potential apartment conversion while allowing DIY installation
Code Context
Guardrails are typically required at any floor opening or open-sided walking surface more than 30 inches above the floor below. The stairwell opening in the loft creates a fall hazard that must be protected with a compliant guardrail:
- Minimum height: 36 inches (residential) or 42 inches (commercial)
- Baluster spacing: Maximum 4 inches between balusters
- Load requirements: Must withstand 200 lbs of force applied in any direction
Visible Elements
Loft Structure
- OSB subfloor (installed Dec 4, 2025 with Titebond glue-and-screw method)
- Exposed roof trusses with metal connector plates
- Dormer window providing natural light
- Knee wall framing along the perimeter
Railing Requirement (Red Annotation)
- Red lines indicate required railing location
- Guardrail needed along the open edge of the stairwell
- Must extend to protect the entire opening
Interior Condition
- Clean, dry interior space
- No insulation installed yet
- Ready for interior finish work once electrical service is complete
Planned Solution: Frame Full Wall + Partial Sheathing
Smart Approach — Build the Future Bathroom Wall Now
Since this guardrail location will become a permanent wall (stairwell on one side, bathroom on the other), frame the full-height wall now and just sheath the lower portion for the temporary guardrail. This approach:
- Meets code immediately with minimal cost
- Uses scrap materials for sheathing
- Becomes the permanent bathroom wall later — no rework needed
- Provides proper structural attachment to ceiling joists
Construction Plan
                          │← LOFT/BATHROOM SIDE    STAIRWELL SIDE →│
                          │                                        │
Ceiling joists ═══════════════════════════════════════════════════════
                          │         │         │
                          │  Frame  │  Frame  │  ← Full-height 2x4 studs
                          │  only   │  only   │    (no sheathing yet)
                          │         │         │
                   ───────┼─────────┼─────────┼─────── 42" height
                          │         │░░░░░░░░░│
                          │  Open   │░ Scrap ░│  ← Plywood/OSB sheathing
                          │  studs  │░ plywood│    (STAIRWELL SIDE)
                          │         │░░░░░░░░░│
Floor              ═══════╧═════════╧═════════╧═══════
                          │← 16" OC →│
Frame specs:
- 2x4 bottom plate anchored to subfloor
- 2x4 studs 16” on center, full height to ceiling
- Double top plate attached to ceiling joists
- Sheath stairwell side with scrap plywood/OSB from floor to 42” height
- Attach plywood with screws (not nails) for easy removal when finishing stairwell later
Why Sheath the Stairwell Side (Not Room Side)
Construction Access Logic
When building the bathroom later, you’ll spend hours working on this wall — adding insulation, running electrical/plumbing, and installing drywall. Working from the open loft space is much easier than working from the stairwell (on stairs/ladder, confined space).
Stairwell-side sheathing advantages:
- Bathroom construction access — Work from the spacious loft side when finishing the wall
- Standard wall assembly — Add insulation from room side, then drywall over studs (normal workflow)
- Stairwell finishes last — The stairwell will likely be one of the last areas to get drywall; temporary plywood there is fine
- Easy removal — Screws allow clean removal when ready to finish stairwell with drywall
If sheathing were on room side:
- You’d have to work from the stairwell (awkward)
- Adding insulation from stairwell side is trickier
- Plywood on bathroom side means drywall over it (adds thickness) or remove it (wasteful)
Future Bathroom Considerations
When ready to convert to bathroom, this wall will separate the stairwell from the bathroom. Plan ahead now:
Plumbing (rough-in or mark locations):
- Toilet drain location (3” ABS, needs to route down to mechanical room)
- Sink drain and supply lines
- Potential shower/tub drain location
- Vent stack routing
Electrical (rough-in boxes while wall is open):
- GFCI outlet box (required for bathroom)
- Light switch box
- Exhaust fan switch box
- Consider heated floor thermostat location
Blocking (add now while framing):
- Horizontal 2x4 at 36-48” for towel bar mounting
- Horizontal 2x4 at 26” for toilet paper holder
- Consider grab bar blocking for future accessibility
Exhaust fan routing:
- Plan duct path to exterior (through roof or wall)
- Rough-in duct chase if possible
Materials List (Scrap-Friendly)
| Item | Quantity | Notes |
|---|---|---|
| 2x4 studs (8 ft) | 5-6 | Full height framing |
| 2x4 plates (length of opening) | 3 | Bottom + double top plate |
| Plywood/OSB scraps | ~20-25 sq ft | ½”+ thickness, lower 42” only, stairwell side |
| 3” construction screws | 1 lb | Framing |
| 1½” screws | 1 lb | Sheathing (screws not nails for easy removal later) |
Estimated cost: $15-30 if purchasing lumber; nearly free if using scraps
Action Items
- Measure stairwell opening dimensions for framing
- Inventory available scrap lumber and plywood
- Purchase any needed 2x4s
- Frame full-height wall with studs 16” OC
- Add blocking for future bathroom fixtures
- Mark/photograph locations for future plumbing rough-in
- Sheath stairwell side from floor to 42” with scrap plywood
- Schedule follow-up inspection after guardrail installation
Related Documents
- Stairwell Wall Construction Plan - Visual Mockup - MSPaint-style visualization of proposed wall
- Initial Build - Build progress documentation
- Timeline - Project timeline
- Loft Flooring Plan - Loft interior planning
- Loft Electrical Planning - Subpanel rough-in considerations
- Dec 9, 2025 - Stair rough-in progress